How to build a regex engine from scratch
In this article, we'll build a simple regular expression engine that will be able to use [a-zA-Z][a-zA-Z0-9_.]+@[a-zA-Z0-9]+.[a-zA-Z]{2,} pattern (. is used as literal instead of any character) to check for the validity of email addresses. We will use Golang. The article is divided into 3 sections:
Parsing
On its own, a regex string is just that --- a string. We need to transform it into something that has a structure. Such as the following:
// original regex string
"[a-zA-Z0–9_]+@[a-zA-Z0–9]+.[a-zA-Z]{2,}"
// regex tokens
Repeat ( 1 , infinity ) :
Range ( a , b , ... z , A , B , ... , Z , 0 , ... , 9 , _ )
Literal ( @ )
Repeat ( 1 , infinity ) :
Range ( a , b , ... z , A , B , ... , Z , 0 , ... , 9 )
Literal ( . )
Repeat ( 2 , infinity ) :
Range ( a , b , ... z , A , B , ... , Z )
In this section, we'll go over the process of parsing a regex string into tokens.
The core idea when it comes to parsing a regex string is simple, we will look for the characters that have special meanings such as * + ? () [] {} etc. and will try to create tokens with the help of those characters. It'll be more clear once we start writing some code.
Before getting into the parsing algorithm, let's define some types and constants.
type tokenType uint8 // <1>
const ( // <2>
group tokenType = iota
bracket tokenType = iota
or tokenType = iota
repeat tokenType = iota
literal tokenType = iota
groupUncaptured tokenType = iota
)
type token struct { // <3>
tokenType tokenType
// the payload required for each token will be different
// so we need to be flexible with the type
value interface { }
}
type parseContext struct { // <4>
// the index of the character we're processing
// in the regex string
pos int
tokens [ ] token
}
- It's just a type alias for the character type
- Constants for specifying the type of the token we are working with; think enums.
- The main token struct, it has a type and a value which can be anything depending on the given type
parseContextwill help us keep track of our positions and will hold the tokens parsed so far
Now, next is our parsing algorithm:
func parse ( regex string ) * parseContext {
ctx := & parseContext {
pos : 0 ,
tokens : [ ] token { } ,
}
for ctx . pos < len ( regex ) {
process ( regex , ctx )
ctx . pos ++
}
return ctx
}
- We loop through each character and process it until we reach to the end of the regex string.
Next, let's take a look at the process method. It's a bit more involved, so let's take it step by step.
func process ( regex string , ctx * parseContext ) {
ch := regex [ ctx . pos ]
if ch == '(' { // <1>
groupCtx := & parseContext {
pos : ctx . pos ,
tokens : [ ] token { } ,
}
parseGroup ( regex , groupCtx )
ctx . tokens = append ( ctx . tokens , token {
tokenType : group ,
value : groupCtx . tokens ,
} )
} else if ch == '[' { // <2>
parseBracket ( regex , ctx )
} else if ch == '|' { // <3>
parseOr ( regex , ctx )
} else if ch == '*' || ch == '?' || ch == '+' { // <4>
parseRepeat ( regex , ctx )
} else if ch == '{' { // <5>
parseRepeatSpecified ( regex , ctx )
} else { // <6>
// literal
t := token {
tokenType : literal ,
value : ch ,
}
ctx . tokens = append ( ctx . tokens , t )
}
}
As we mentioned earlier, we try to match the characters we recognize and use them to parse tokens.
- If the current character is
(, the opening parenthesis, we know we're dealing with a group, thus we try to parse the next couple of characters as a group. - If it's
[, the opening bracket, we know that it's a bracket expression, so we proceed accordingly. - If the character is a vertical pipe -
|, that's an Or expression (alternative). - The characters
*(Kleene's star),+and?all represent repetition. I know that?means optional, but in terms of repetition, it simply means that the character repeats at most once. - Curly braces specify repetition as well. In fact, the previous repetition options can all be specified using braces:
-
a* == a{0,}-a+ == a{1,}-a? == a{0,1} - If the character did not match with anything, we consider it as a literal. Please keep in mind that this is a simplified implementation. There are a lot of cases to consider when it comes to parsing regular expressions; for instance, 1 is a literal, but depending on the context it can actually be a part of a backreference
\1that refers to the first captured group. Our simplified algorithm also DOES NOT consider the escape characters (which means\ais considered as a concatenation of two literals:\anda).
Next, we'll examine each function defined in the above snippet. Let's start with the parsing of group expressions (1):
func parseGroup ( regex string , ctx * parseContext ) {
ctx . pos += 1 // get past the LPAREN (
for regex [ ctx . pos ] != ')' {
process ( regex , ctx )
ctx . pos += 1
}
}
- We process each character like we did in the
parsemethod until we encounter the closing parenthesis. We will not cover the error handling in this tutorial, so we're simply not checking if the index is still within bounds. It will panic anyway.
What about the extra code around parseGroup in the process function? What happens there? Here's the snippet:
// snippet from the `process` function
groupCtx := & parseContext {
pos : ctx . pos ,
tokens : [ ] token { } ,
}
// parsing
parseGroup ( regex , groupCtx )
ctx . tokens = append ( ctx . tokens , token {
tokenType : group ,
value : groupCtx . tokens ,
} )
- We create a new context specific to each group, so that we'll be able to bundle together all the tokens within a specific group without dealing with the top level context object.
- Once we're done parsing the group, we bundle all the parsed tokens into a new token of type
groupand append it to the global token list.
Let's now see how we can parse bracket expressions (2). This is the whole function, but we'll cover it step by step.
func parseBracket ( regex string , ctx * parseContext ) {
ctx . pos ++ // get past the LBRACKET
var literals [ ] string
for regex [ ctx . pos ] != ']' { // <1>
ch := regex [ ctx . pos ]
if ch == '-' { // <2>
next := regex [ ctx . pos + 1 ] // <3-1>
prev := literals [ len ( literals ) - 1 ] [ 0 ] // <3-1>
literals [ len ( literals ) - 1 ] = fmt . Sprintf ( "%c%c" , prev , next ) // <3-2>
ctx . pos ++ // to consume the 'next' char
} else { // <4>
literals = append ( literals , fmt . Sprintf ( "%c" , ch ) )
}
ctx . pos ++ // <5>
}
literalsSet := map [ uint8 ] bool { }
for _ , l := range literals { // <6>
for i := l [ 0 ] ; i <= l [ len ( l ) - 1 ] ; i ++ { // <7>
literalsSet [ i ] = true
}
}
ctx . tokens = append ( ctx . tokens , token { // <8>
tokenType : bracket ,
value : literalsSet ,
} )
}
- Similar to the way we parsed the group expression, we go through each character till we reach the closing bracket (
]). - For each character we check if it is
-because that's the range indicator (e.g.,a-zK-Z2-8). - When it is indeed the range indicator:
- We take the next character from the regex string, and the previous character from the list of literals (it's the last character in that list).
- Then we save it back to the list as 2 characters together. We could choose a different way of saving the parsed literals, but I find this to be simple and easy to understand.
- If it's not the range indicator we consider it a single literal, and save it to the list.
- Move on to the next character
literalslist contains both literals and ranges. But those may contain duplicates. Consider the following regex:[a-me-s]. There's a clear overlap between the ranges. We go over the saved values and add each literal to theliteralsSet. By definition, sets do not contain duplicates, so that gets the job done. Since we're implementing this in Golang, we are using a map because there are no natively provided sets in Golang, and installing a library just for a set is unnecessary.- Add all the characters between the first and last characters of the saved value.
- In single literals, this will only add the literal itself. Example:
bwill only addb - In ranges, it will add everything from the first character till the last character (inclusive). Example:
adwill adda,b,c,d - Finally, once we have all the duplicates removed, we save the bracket token to our list of tokens.
Next in line is parseOr which is able to parse alternations (3).
func parseOr ( regex string , ctx * parseContext ) {
// <1:start>
rhsContext := & parseContext {
pos : ctx . pos ,
tokens : [ ] token { } ,
}
rhsContext . pos += 1 // get past |
for rhsContext . pos < len ( regex ) && regex [ rhsContext . pos ] != ')' {
process ( regex , rhsContext )
rhsContext . pos += 1
}
// <1:end>
// both sides of the OR expression
left := token {
tokenType : groupUncaptured ,
value : ctx . tokens , // <2>
}
right := token { // <3>
tokenType : groupUncaptured ,
value : rhsContext . tokens ,
}
ctx . pos = rhsContext . pos // <4>
ctx . tokens = [ ] token { { // <5>
tokenType : or ,
value : [ ] token { left , right } ,
} }
}
- The alternation (or) operation has the following syntax:
<left>|<right>or(<left>|<right>)meaning it is an alternation between what's in the left hand side and what's on the right hand side. By the time we encounter the|symbol, we've already parsed everything to the left of it. Now, it's time to parse everything to the right. It's almost the same code as parsing groups. We create a right-hand-side specific empty context, and collect all the tokens into it. We do this until the end of the regex string or until we face a closing parenthesis. - Now that we are done parsing both sides, it's time to create the alternation token. The left side will contain all the tokens that were in the original context object, because it contains all the tokens we have parsed so far.
- For the right hand side, we take all the tokens collected into the
rhsContextobject. For both tokens, we usegroupUncapturedas the type, it's simply a type created to indicate a bundle of tokens. - We update the position of the original context.
- We create the alternation token and add it to the original context. One important thing is that we do not keep the old tokens in the original context as they are already contained in the alternation token.
Now let's look at repetitions (4).
const repeatInfinity = - 1
func parseRepeat ( regex string , ctx * parseContext ) {
ch := regex [ ctx . pos ]
var min , max int
if ch == '*' {
min = 0
max = repeatInfinity
} else if ch == '?' {
min = 0
max = 1
} else {
// ch == '+'
min = 1
max = repeatInfinity
}
// we need to wrap the last token with the quantifier data
// so that we know what the min and max apply to
lastToken := ctx . tokens [ len ( ctx . tokens ) - 1 ]
ctx . tokens [ len ( ctx . tokens ) - 1 ] = token {
tokenType : repeat ,
value : repeatPayload {
min : min ,
max : max ,
token : lastToken ,
} ,
}
}
- Basic idea for this particular method is that each symbol here specifies some minimum and maximum number of repetitions.
repeatInfinityis-1, but we use it as infinity. - Once we have the boundaries set, we simply take the last parsed token (because the repetition symbols are always to the right side of the token), wrap it in a
repeattoken and appropriate boundaries, and finally save it back to the same position in the tokens list.
The other repetition expression has a bit longer code, but the idea is still the same (5).
func parseRepeatSpecified ( regex string , ctx * parseContext ) {
// +1 because we skip LCURLY { at the beginning
start := ctx . pos + 1
// proceed until we reach to the end of the curly braces
for regex [ ctx . pos ] != '}' {
ctx . pos ++
}
boundariesStr := regex [ start : ctx . pos ] // <1>
pieces := strings . Split ( boundariesStr , "," ) // <2>
var min , max int
if len ( pieces ) == 1 { // <3>
if value , err := strconv . Atoi ( pieces [ 0 ] ) ; err != nil {
panic ( err . Error ( ) )
} else {
min = value
max = value
}
} else if len ( pieces ) == 2 { // <4>
if value , err := strconv . Atoi ( pieces [ 0 ] ) ; err != nil {
panic ( err . Error ( ) )
} else {
min = value
}
if pieces [ 1 ] == "" {
max = repeatInfinity
} else if value , err := strconv . Atoi ( pieces [ 1 ] ) ; err != nil {
panic ( err . Error ( ) )
} else {
max = value
}
} else {
panic ( fmt . Sprintf ( "There must be either 1 or 2 values specified for the quantifier: provided '%s'" , boundariesStr ) )
}
// we need to wrap the last token with the quantifier data
// so that we know what the min and max apply to
// <5>
lastToken := ctx . tokens [ len ( ctx . tokens ) - 1 ]
ctx . tokens [ len ( ctx . tokens ) - 1 ] = token {
tokenType : repeat ,
value : repeatPayload {
min : min ,
max : max ,
token : lastToken ,
} ,
}
}
- We need to get the string expression for boundaries which is everything between the curly braces
{}. - Next, we split that string into pieces separated by a comma
, - If there's only one element (e.g.,
{1}) that means the exact number of repeats, sominandmaxwill be the same. The error handling syntax of Golang may make things look complicated, but it just means that if there's any error while converting a string into a integer, just panic and stop everything. - If there are two pieces, the first value is the min, and the second one is the max (e.g.,
{3,7}). However, there's a chance that the second value might be missing:{3,}. In this example, the token is required to repeat at least three times, but no upper bound is set which means it will berepeatInfinity. - Now that we have the boundaries, we take the last parsed token, wrap it in a
repeattoken and appropriate boundaries, and save it back to the same position in the tokens list.
With this, we conclude the steps required for parsing a regex string. Next, we'll examine how we can build a state machine out of those tokens we've parsed.
Building the state machine
In this section, we'll learn how to build a state machine from the tokens we parsed, but first, let's discuss what a state machine is.
What's an finite state machine?
A finite state machine (FSM) or a finite automata (FA) is an abstract machine that consists of a finite set of states, an initial state, terminal states and transitions between those states. FA has 2 types: deterministic finite automata (DFA) and non-deterministic finite automata (NFA).
While automatas are used in many things, what's relevant to our context is the way they are used for checking if a certain text is accepted. Below is an example to a deterministic finite automata. It will only accept the words "abd" and "ace".
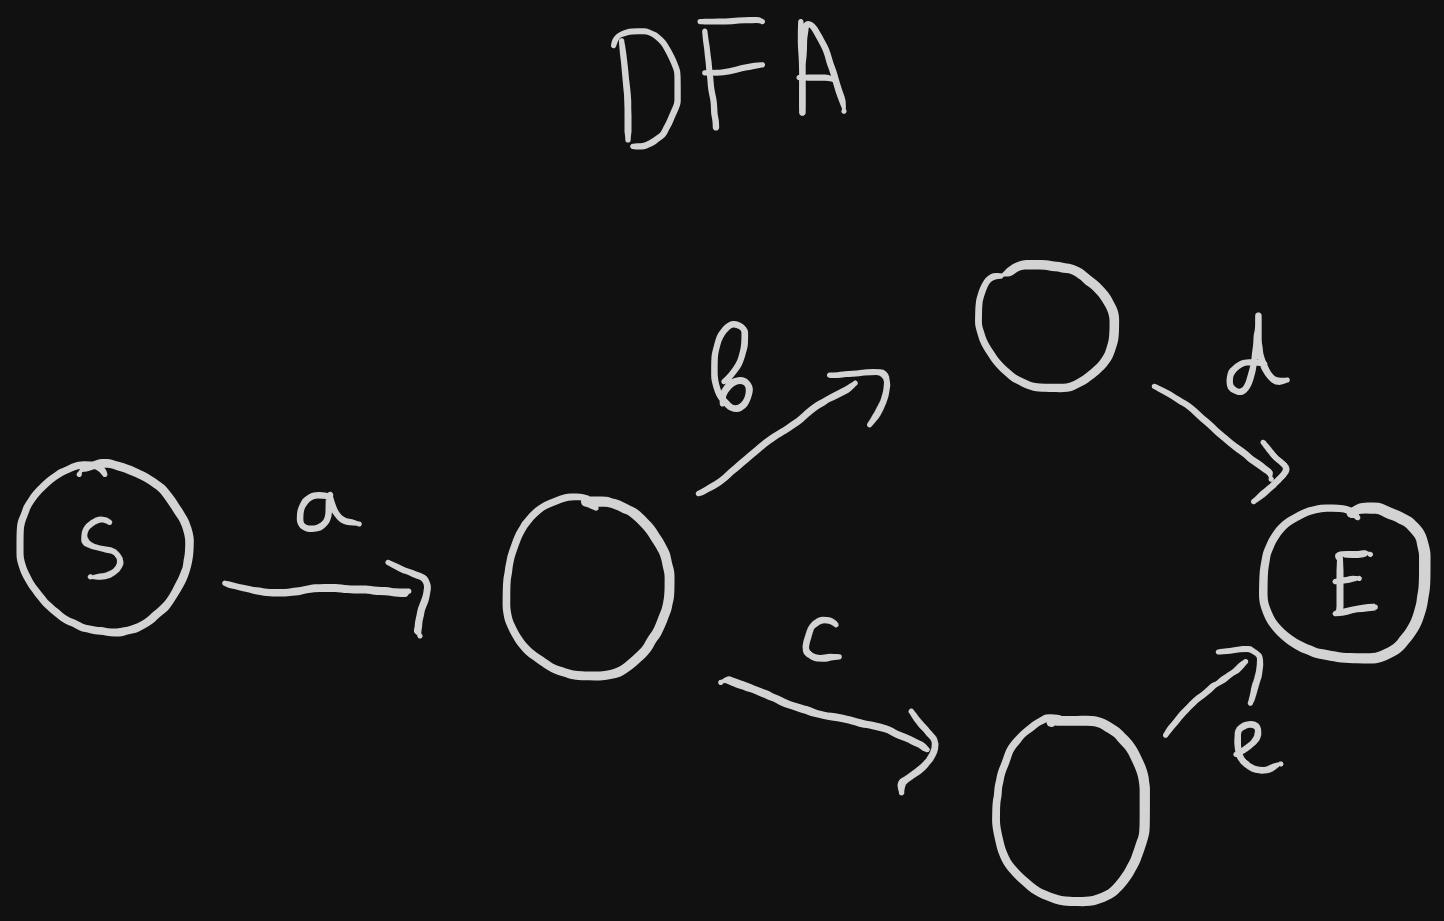
The way this acceptance check is performed is as follows: 1. We're at the start state, always. 2. We take the first character of the input string and see if there's a corresponding transition for that. - if yes, we transition to that state and continue with the next char - if no, the string is not accepted 3. We repeat step 2 with the next set of characters until we finish the string and we check if we're at the end/terminal state. 4. Being on the terminal state means that the string is accepted 5. For the DFA above, "abd" will always end on the terminal state, while "abc" will get stuck before reaching the end state.
In DFAs, given a state, with the same input you will always transition to the same target state. It's deterministic.
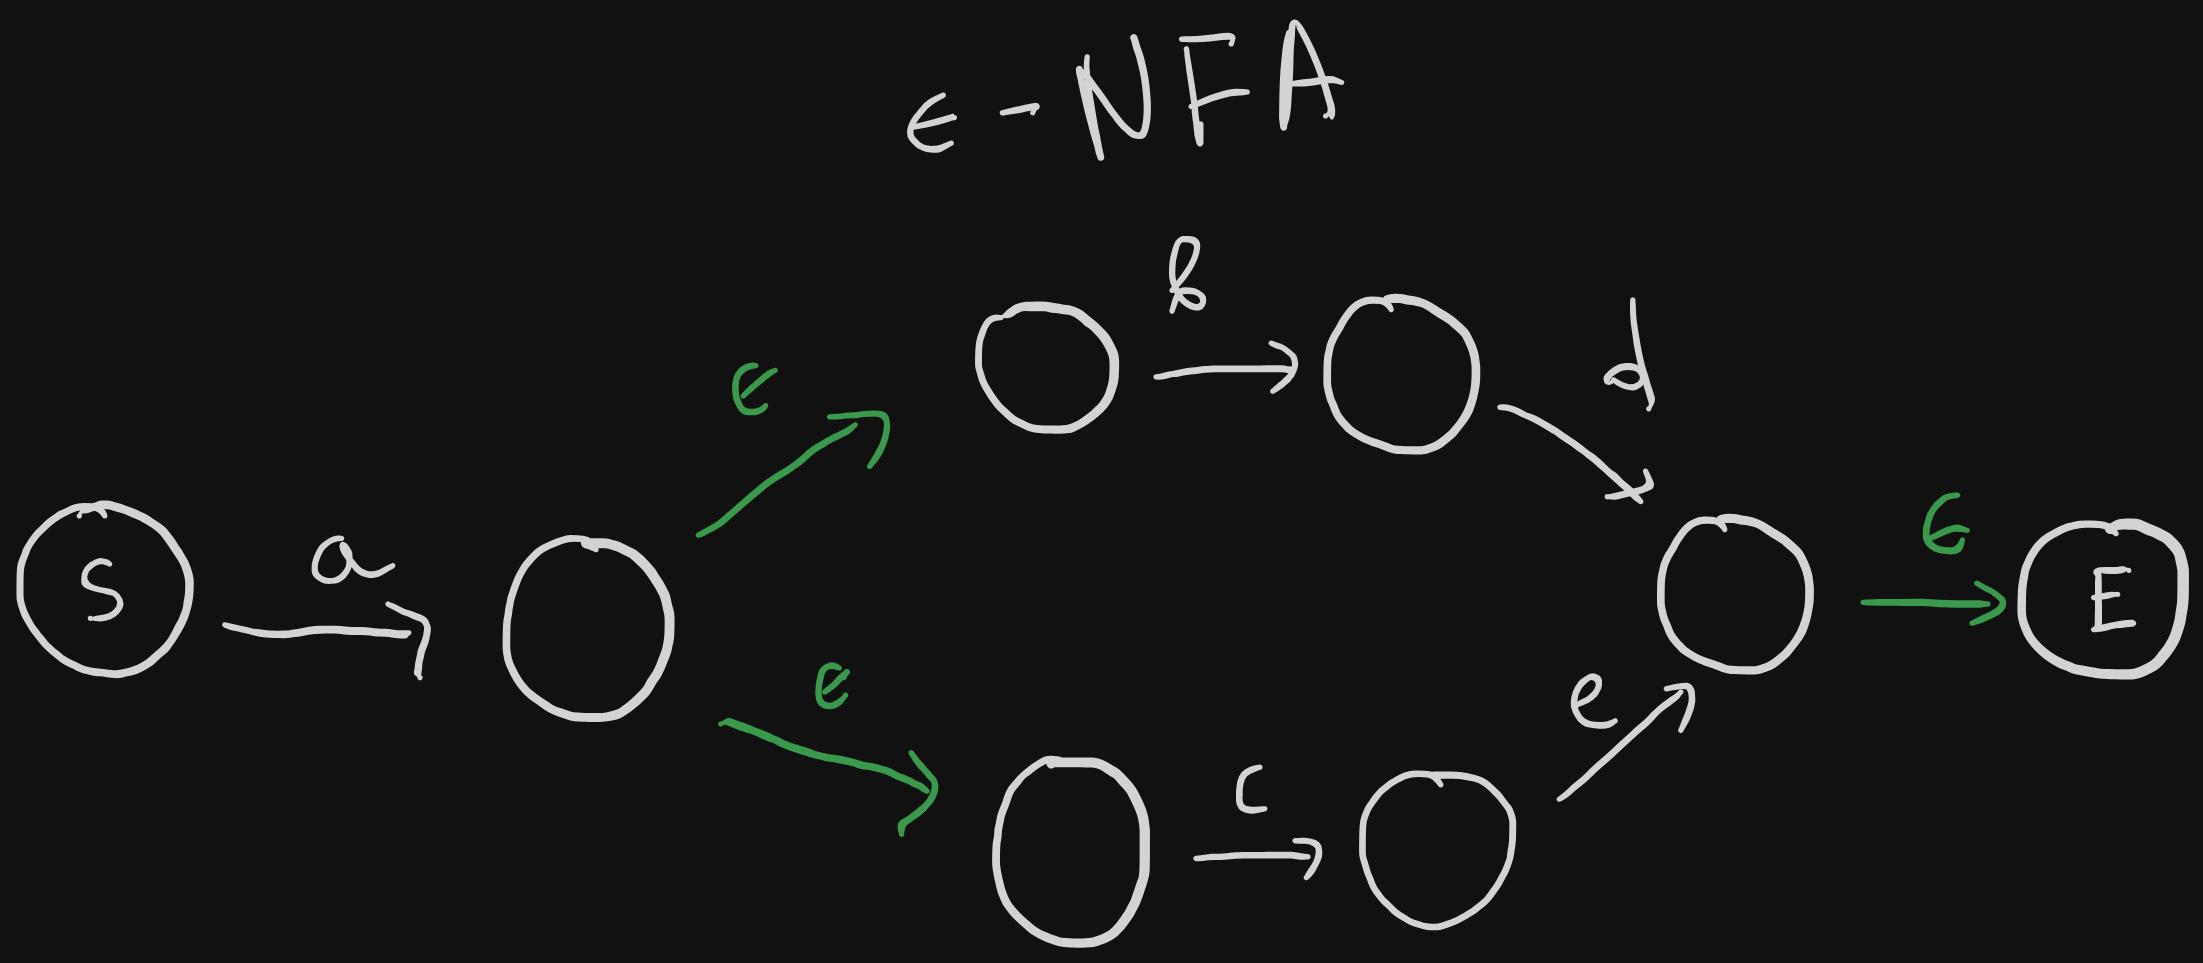
In NFAs, given a state, with the same input you can go to different states, thus this makes it non-deterministic. epsilon represents an empty input. The NFA example above also only accepts the strings: "abd" and "ace". But notice how with the epsilon value you can transition into multiple states.
In the next sections, we will take our list of parsed tokens and create an epsilon-NFA out of them. Once we have the NFA, all we will need to do would be to go through each state and try to consume one character from the input string at a time and see if we end up in the end state.
Regular expression to epsilon-NFA
The previous step provides us with a list of tokens. We now need to convert these to an epsilon-NFA. To achieve this, we will use an algorithm called Thompson's construction. It's an algorithm to construct and combine multiple NFAs into one NFA.
To represent an NFA state, we'll use this simple structure:
type state struct {
start bool
terminal bool
transitions map [ uint8 ] [ ] * state
}
startindicates whether the state's the entrypoint or not.terminalindicates wheteher the state's the final state. Reaching this state means that the input matches with the regex.transitionsis a map where a character maps to a list of different states.
This is the high-level visualization of the NFA construction algorithm:
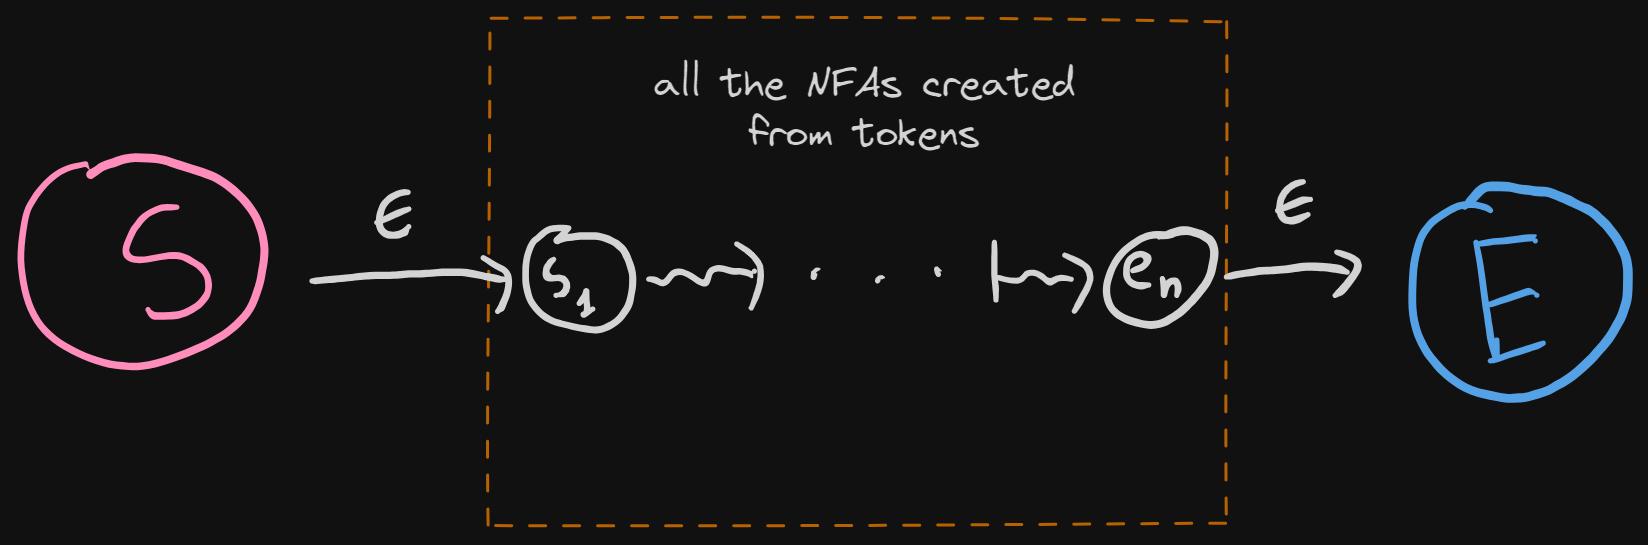
- We will have a start (pink) and terminal (blue) states.
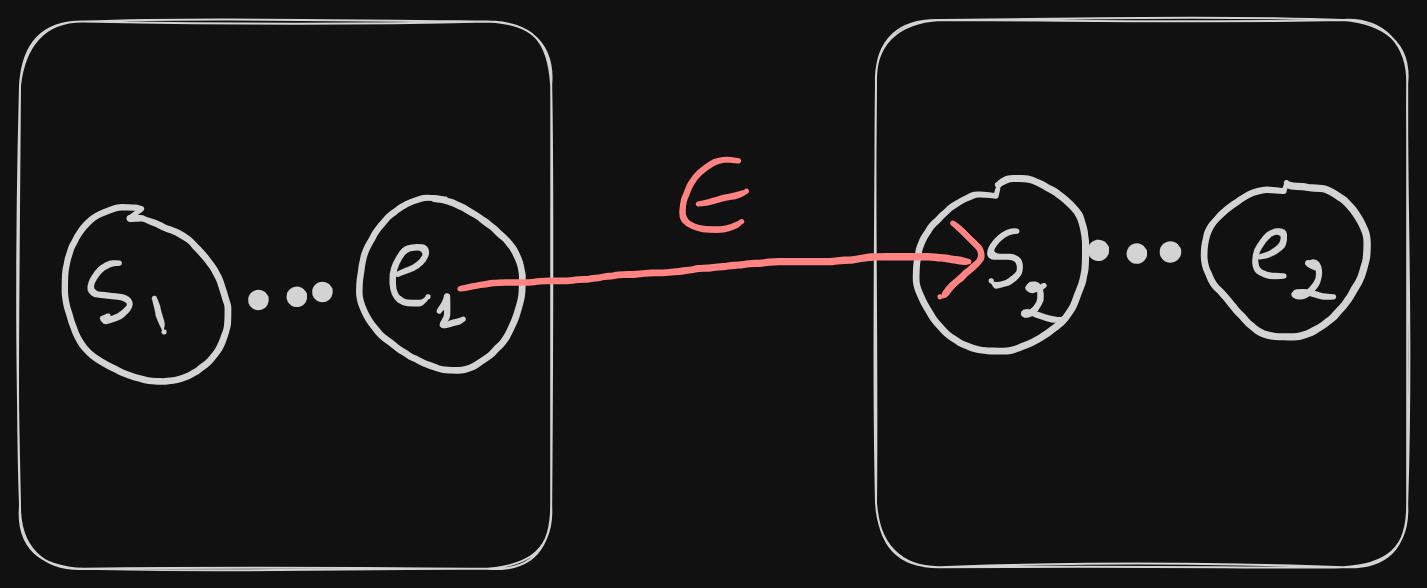
- For each token, we'll create a separate NFA, and these NFAs will be concatenated with epsilon transitions. Last state of the previous NFA, will be connected to the first state of the next NFA, like this:
- There will be an epsilon transition from the start state to the first state (s1) of the concatenated NFAs.
- There will be an epsilon transition from the last state of the concatenated NFAs to the terminal state.
Let's go over the same thing in code:
const epsilonChar uint8 = 0 // empty character
func toNfa ( ctx * parseContext ) * state {
startState , endState := tokenToNfa ( & ctx . tokens [ 0 ] ) // <1>
for i := 1 ; i < len ( ctx . tokens ) ; i ++ { // <2>
startNext , endNext := tokenToNfa ( & ctx . tokens [ i ] ) // <3>
endState . transitions [ epsilonChar ] = append (
endState . transitions [ epsilonChar ] ,
startNext ,
) // <4>
endState = endNext // <5>
}
start := & state { // <6>
transitions : map [ uint8 ] [ ] * state {
epsilonChar : { startState } ,
} ,
start : true ,
}
end := & state { // 7
transitions : map [ uint8 ] [ ] * state { } ,
terminal : true ,
}
endState . transitions [ epsilonChar ] = append (
endState . transitions [ epsilonChar ] ,
end ,
) // <8>
return start // <9>
}
- We take the first token, and convert that to an NFA.
tokenToNfafunction will be explained later. For now, just know that it creates an NFA from the given token, and returns the start and end states of this newly created NFA. - We go over the rest of tokens
- We call
tokenToNfafor each token and save the start and end states. - We link the end state from the previous
tokenToNfacall to the start state of the new NFA. - Save the end state, because it will be useful in the next iteration
- We create the previously mentioned start state. This state now has an epsilon transition to the start state of the very first NFA we created.
- We create the terminal state.
- The end state of the last NFA we created now has an epsilon transition to the terminal state.
- Finally, we return the start state because that's the entrypoint.
Now that we have the outline of what we're doing to construct our NFA, let's take a look at how each token is converted into an NFA.
// returns (start, end)
func tokenToNfa ( t * token ) ( * state , * state ) {
start := & state {
transitions : map [ uint8 ] [ ] * state { } ,
}
end := & state {
transitions : map [ uint8 ] [ ] * state { } ,
}
switch t . tokenType {
case literal :
case or :
case bracket :
case group , groupUncaptured :
case repeat :
default :
panic ( "unknown type of token" )
}
return start , end
}
- The code above is the skeleton of the
tokenToNfafunction, we'll go over each token type and how it is handled. - Overall, we create empty
startandendstates, perform some logic within switch statement, and return those variables.
In the next couple of sections, we'll go over each token type, visualize the steps and finally show the code.
Literals
Let's start with the literals as they are the simplest to explain.
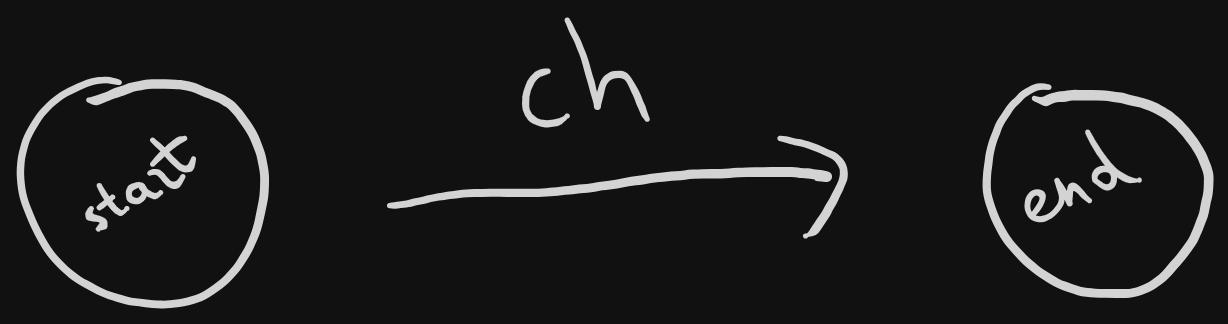
- In order to go from
starttoend, we need the transitionch.chrepresents a single character.
case literal :
ch := t . value . ( uint8 )
start . transitions [ ch ] = [ ] * state { end }
- We can see the exact same thing in the code as well.
t.valueis referring to the value we saved in thetokenstruct back when we were parsing the tokens.
or/alternative
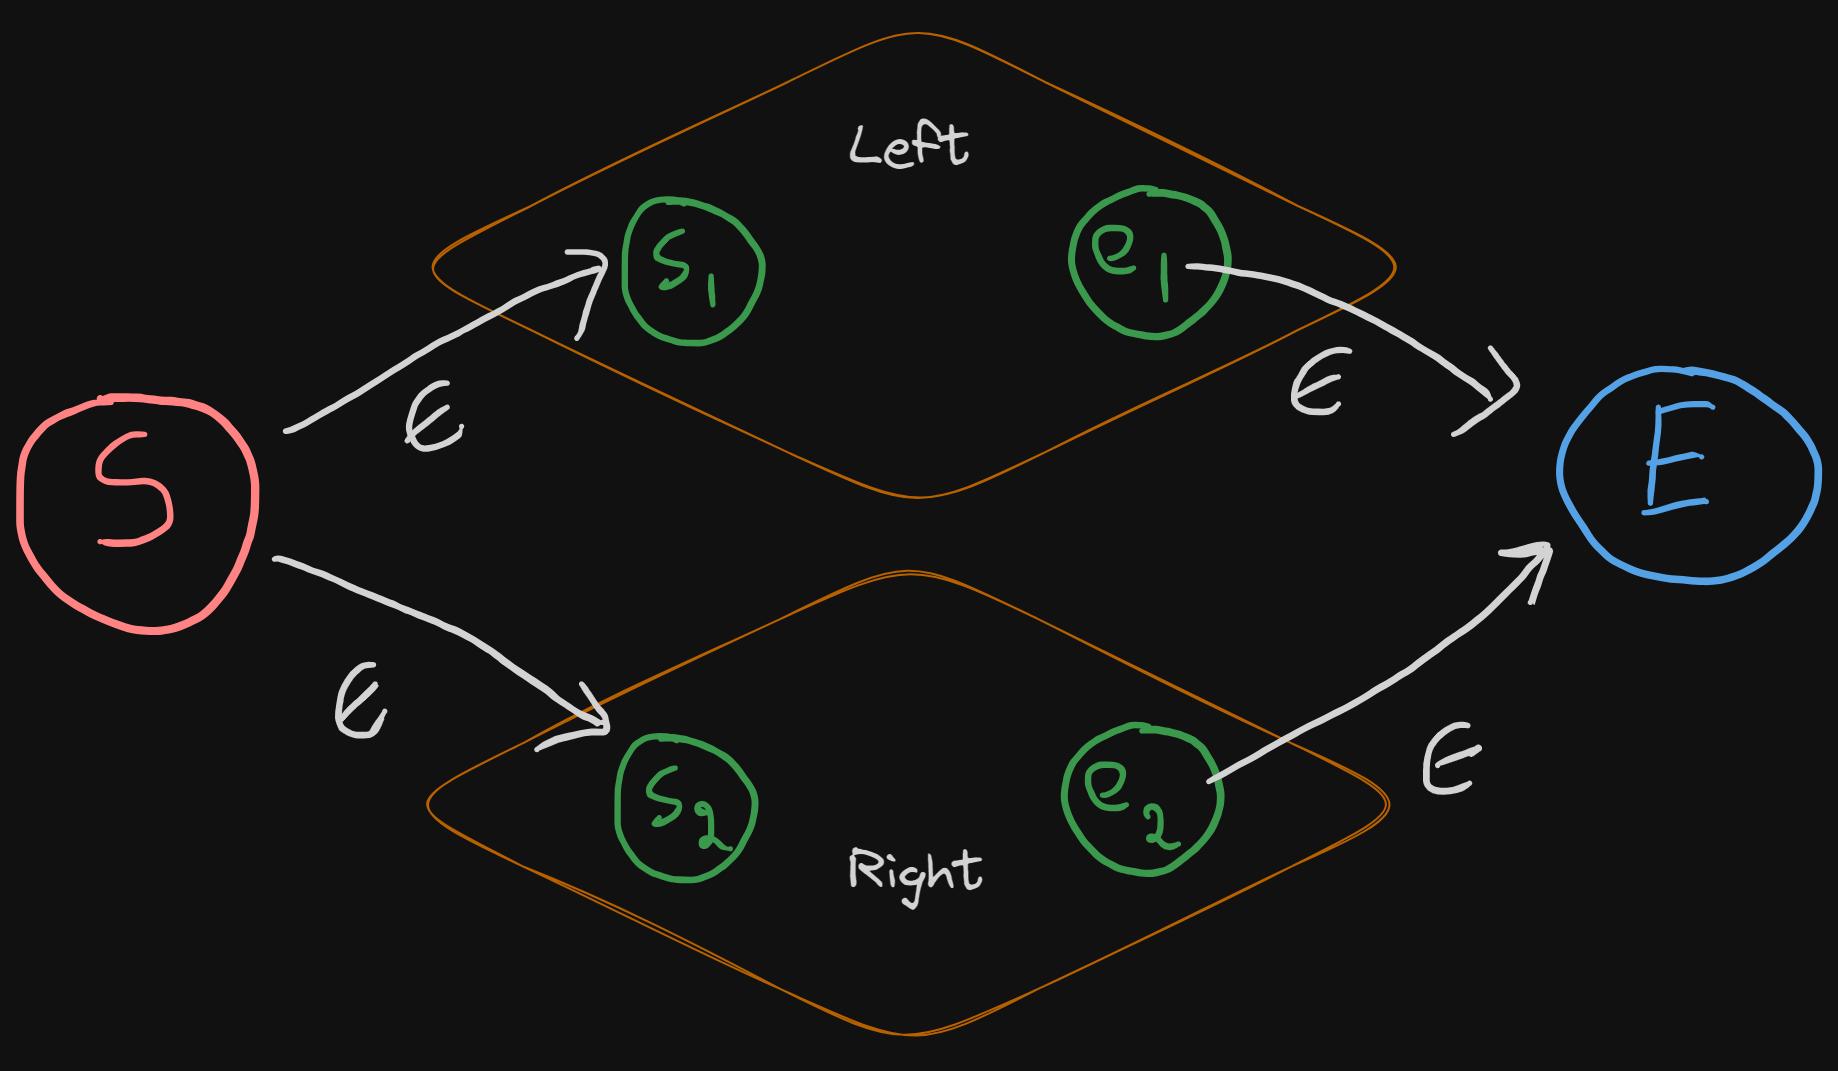
- Or means a choice between two different paths. Recall that in the parsing phase, the value for the or token had left and right sides (shown in the diagram as well). Each of these tokens represents different NFAs.
- To create the Or NFA, we need to have:
- an epsilon transition from the start state to the starts of both left and right NFAs
- an epsilon transition from the ends of both left and right NFAs to the end state.
case or :
values := t . value . ( [ ] token )
left := values [ 0 ]
right := values [ 1 ]
s1 , e1 := tokenToNfa ( & left ) // <1>
s2 , e2 := tokenToNfa ( & right ) // <1>
start . transitions [ epsilonChar ] = [ ] * state { s1 , s2 } // <2>
e1 . transitions [ epsilonChar ] = [ ] * state { end } // <3>
e2 . transitions [ epsilonChar ] = [ ] * state { end } // <3>
- Creating both left and right NFAs
- Connecting the start state with the starts of both NFAs with an epsilon transition
- Connecting the end states of each NFA with the end state of the Or NFA.
Bracket expression
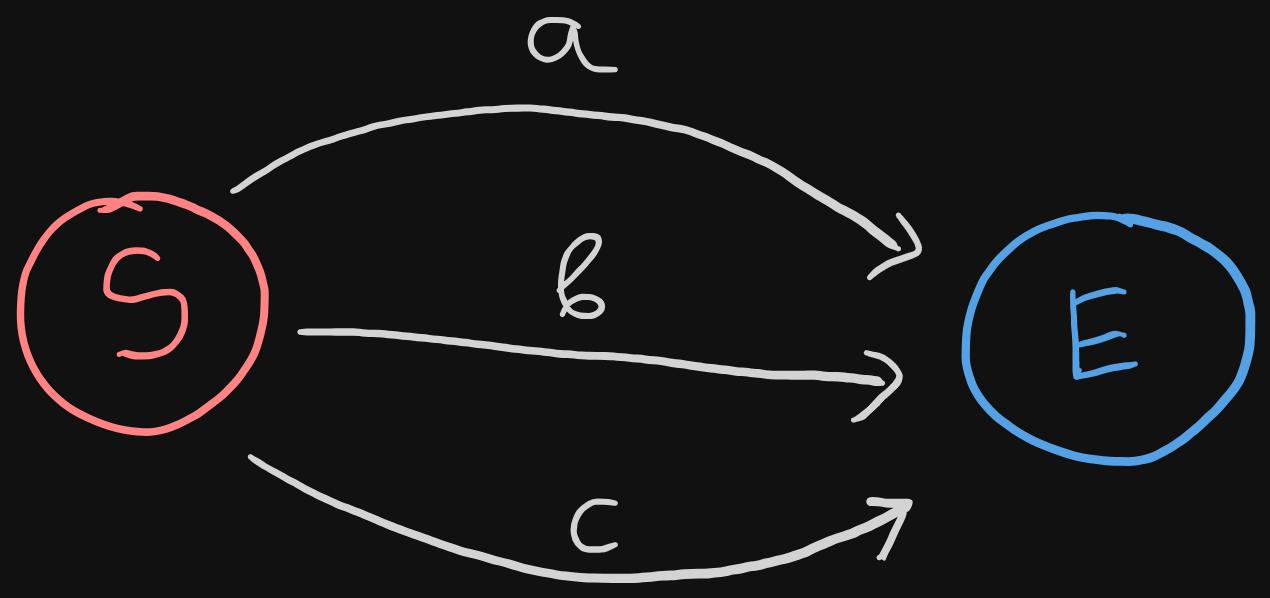
- We can think of bracket expressions as a big Or expressions. For example,
[a-c0-2x]meansa|b|c|0|1|2|x. So it makes sense for it to visually resemble the Or expression. One minor difference is that in bracket expressions we work with literals and not arbitrary NFAs, so we can simply create a transition for each literal from the start state to the end state. - The image is the visualization of the expression:
[a-c]
case bracket :
literals := t . value . ( map [ uint8 ] bool )
for l := range literals { // <1>
start . transitions [ l ] = [ ] * state { end } // <2>
}
- We go through each literal in the bracket
- We add a transition from the
startstate to theendstate.
Although in our regex engine, we will not implement a negated bracket expression (where the characher should be none of the specified chars), this is how the Thompson construction would look like:
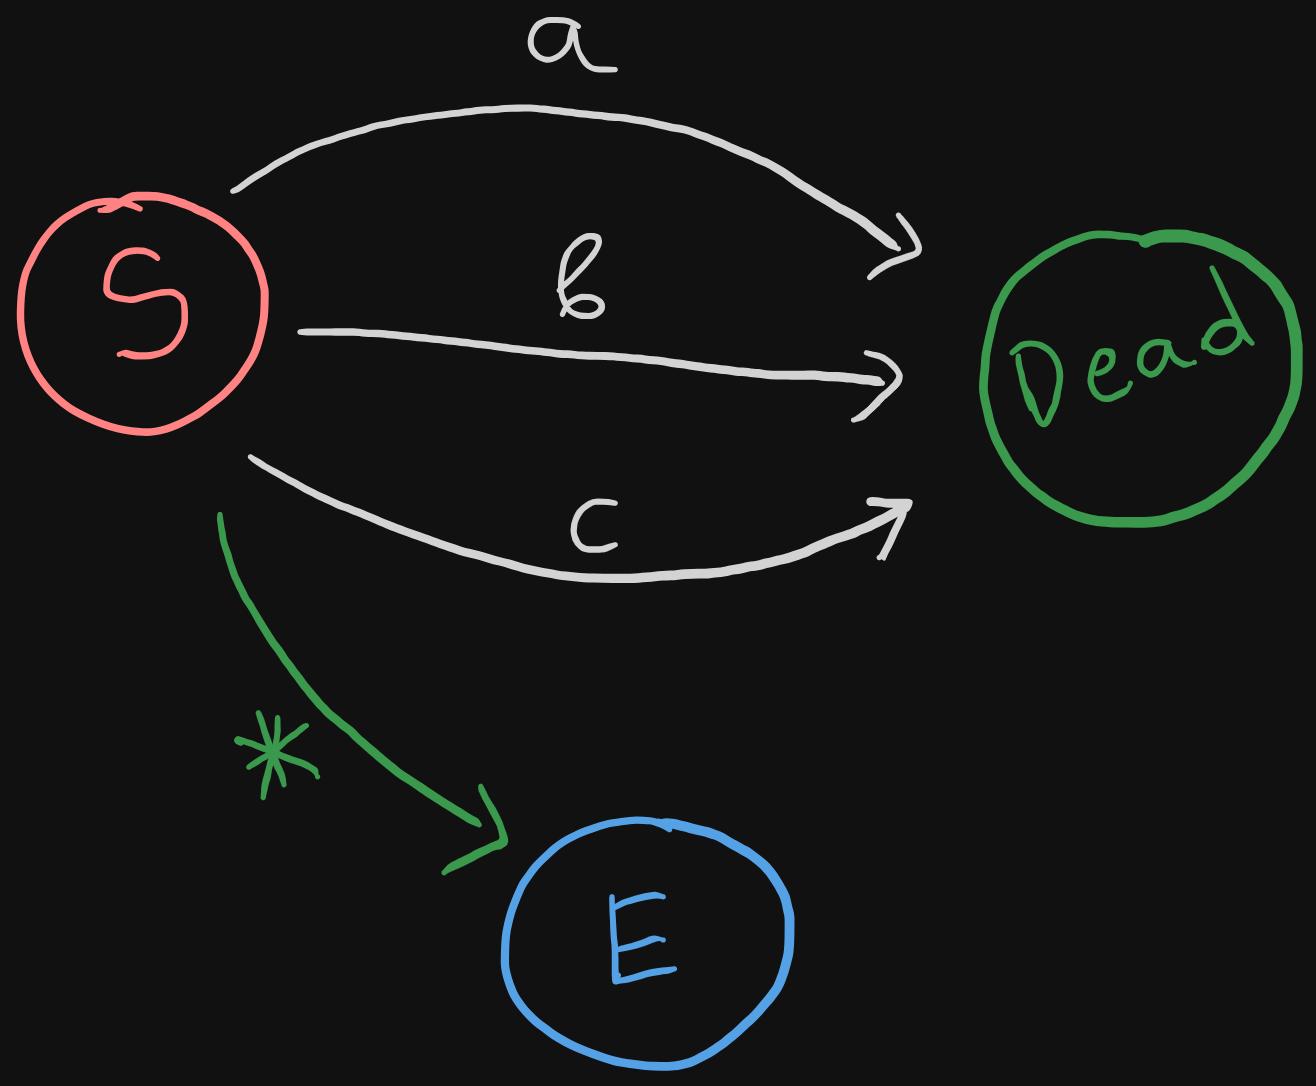
*represents any character- This really depends on the way the engine is implemented, but one simple way could be to look for exact matches, if there's none, we could use the any character transition.
- By matching the exact characters first, we could simply send the text containing those characters into a dead end, resulting in a non-match.
Groups
To convert a group expression into an NFA, we need to concatenate all the individual NFAs created from the tokens inside the group. We've already seen how this is done when we covered toNFA function. The code is exactly the same, with different variable names:
// there is no difference between
// group, groupUncaptured types in our engine
case group , groupUncaptured :
tokens := t . value . ( [ ] token )
start , end = tokenToNfa ( & tokens [ 0 ] )
for i := 1 ; i < len ( tokens ) ; i ++ {
ts , te := tokenToNfa ( & tokens [ i ] )
end . transitions [ epsilonChar ] = append (
end . transitions [ epsilonChar ] ,
ts ,
)
end = te
}
Repetition
Out of all the examples we've covered, understanding repetition might be the trickiest, thus we'll take it step by step and try to figure out a generalized solution that covers all repetition cases.
In all the examples, we're about to go through, A will represent any NFA.
Let's start with asterisk (Kleene's star), plus and question mark (optional). In each of the three examples below, we've also specified the corresponding minimum and maximum occurrence requirements.
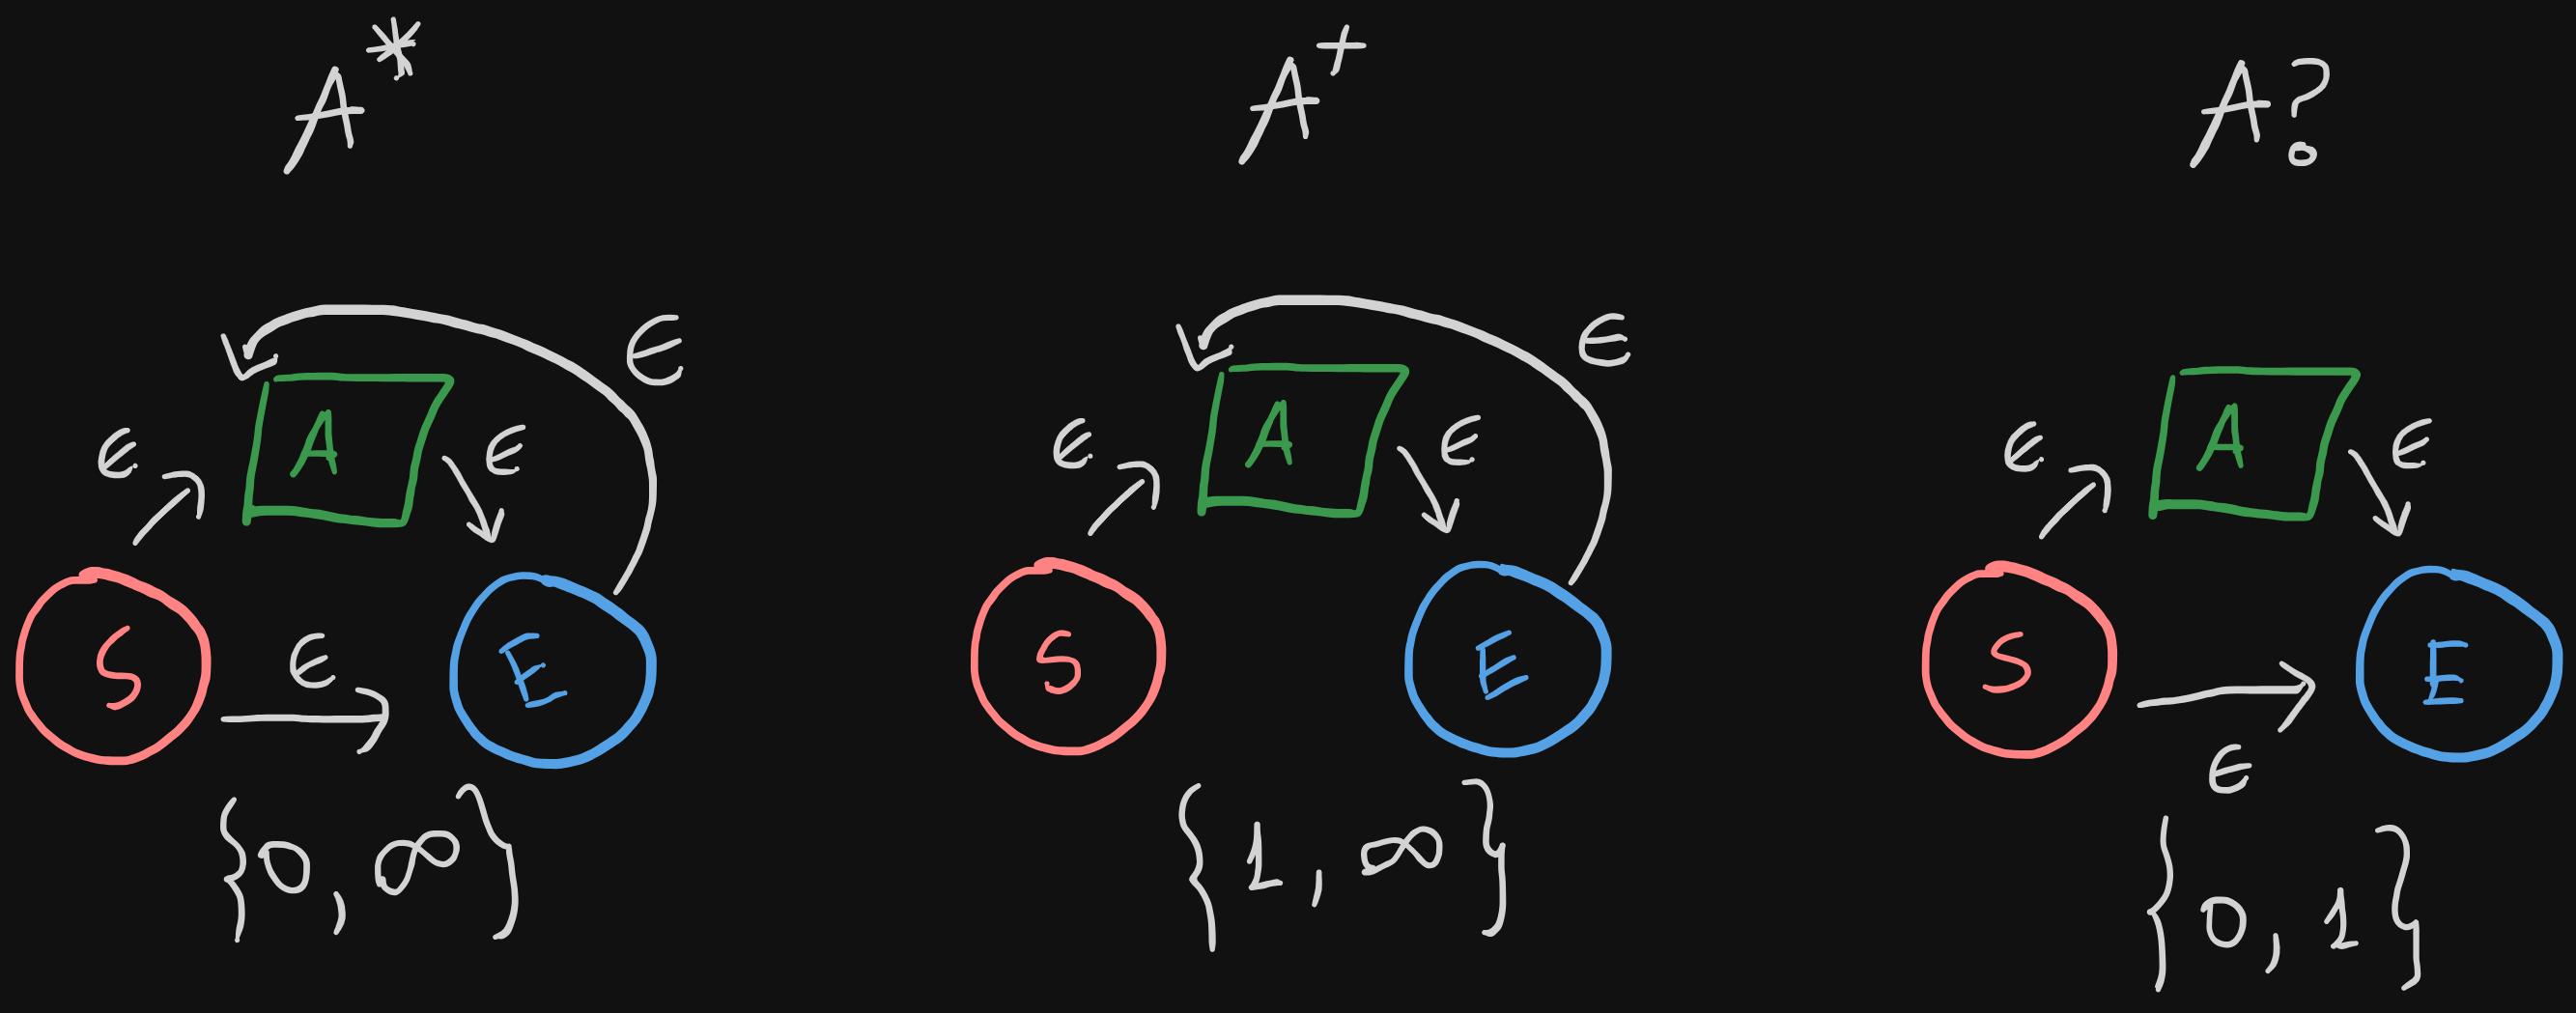
- Each example has an epsilon transition from start state to the start of
A, and from the end ofAto the end state. This indicates repeating the NFAAexactly once. *, means thatAcan be skipped or repeated any number of times:- For skipping
A, we add an epsilon transition from the start state to the end state directly, bypassingAaltogether. - For repeating any number of times, we add an epsilon transition from the end state to the start of
A
- For skipping
+means thatAmust be repeated at least once, and no upper bound is set.- To achieve the the minimum occurrence requirement (which is 1), we simply remove the epsilon transtion from the
*example. Now, there's no way to bypassA.
- To achieve the the minimum occurrence requirement (which is 1), we simply remove the epsilon transtion from the
?means thatAcan either be skipped or it can occur exactly once- This is very similar to
*example, and we only need to remove the epsilon transition from the end state to the start ofA.
- This is very similar to
- Notes:
- If minimum is 0, add an epsilon transition from start state to the end state
- If maximum is infinity, add an epsilon transition from the end state to the start of the
A.
Next, let's take a look at the case where exact number of repetitions are specified.
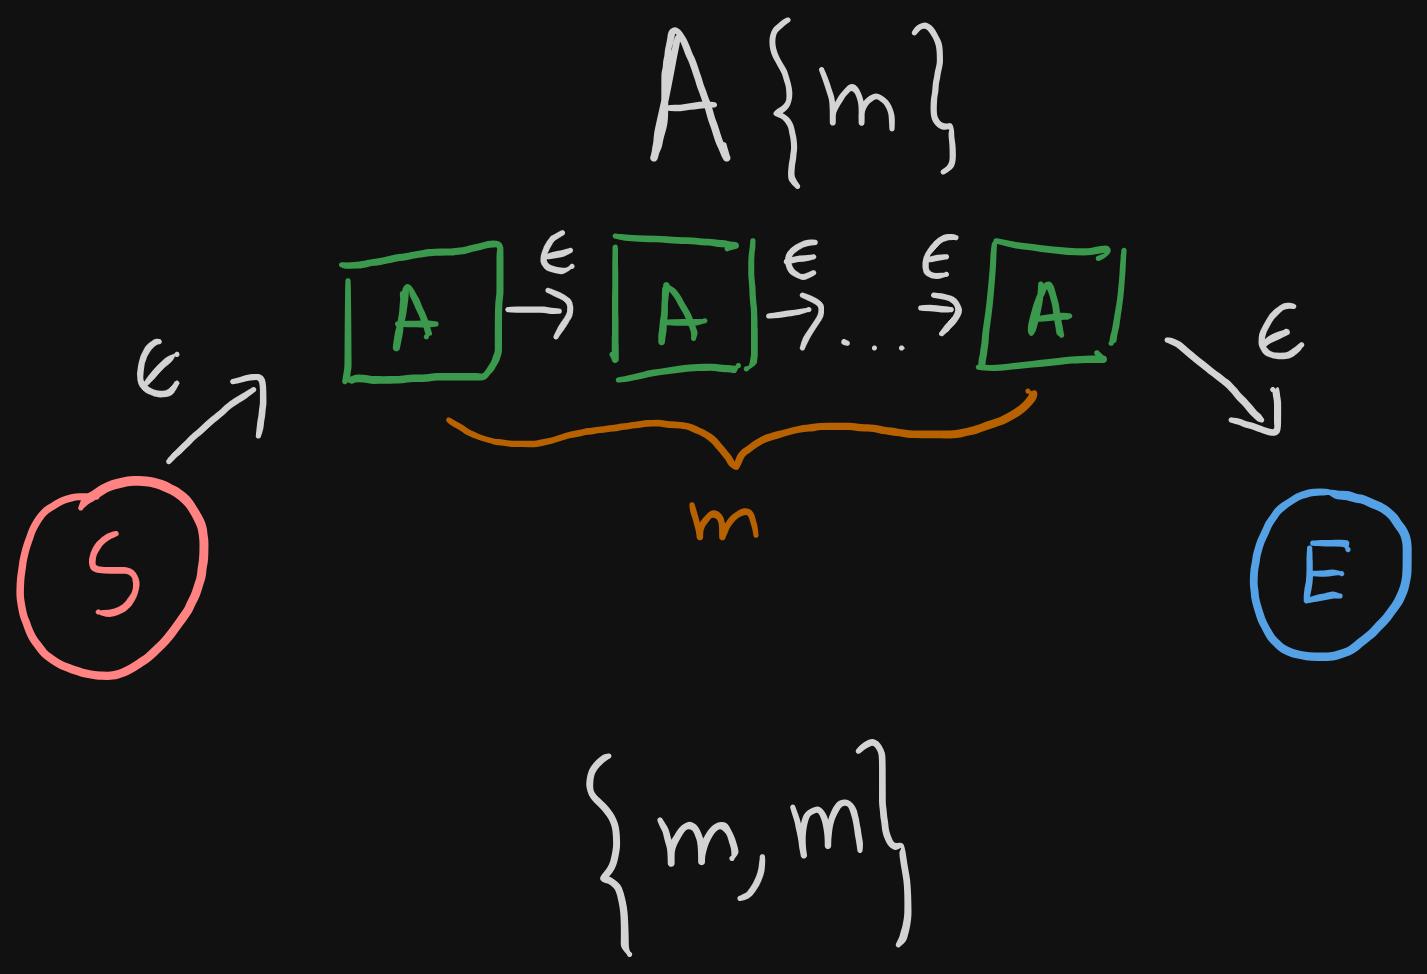
- We simply concatenate the same NFA
Am times.
What if the minimum is specified, but the upper bound is the infinity?
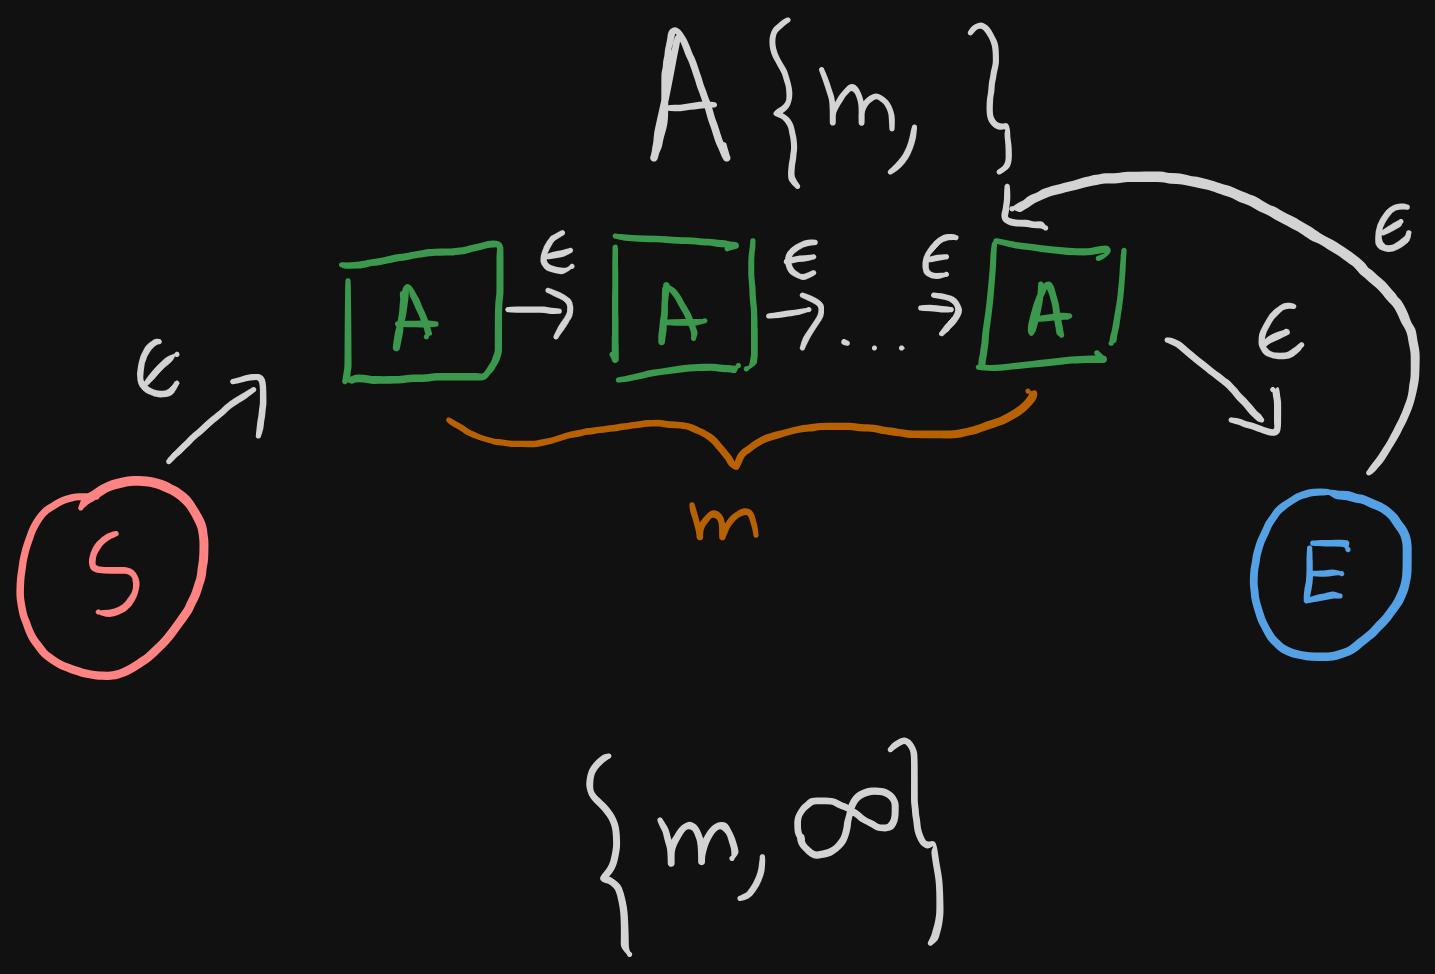
- We still concatenate the same NFA
Am times because that's the minimum amount of times it needs to repeat. - But we also add an epsilon transition from the end state to the start of the final instance of
A(remember the second note from above)
Now, onto the final case. Both minimum and maximum number of occurrences are specified, and maximum is not infinity.

- We know that
Aneeds to repeat m times. This means that we have to concatenateAm times. - The remaining (n-m) repetitions are completely optional. So at any point, after matching the minimum number of repetitions, we should be able to go to the end state.
- To achieve the early termination, all we need to do is to add an epsilon transition from the start state of each
Ainstance to the end state.
Let's now see how this is actually coded:
case repeat :
p := t . value . ( repeatPayload )
if p . min == 0 { // <1>
start . transitions [ epsilonChar ] = [ ] * state { end }
}
var copyCount int // <2>
if p . max == repeatInfinity {
if p . min == 0 {
copyCount = 1
} else {
copyCount = p . min
}
} else {
copyCount = p . max
}
from , to := tokenToNfa ( & p . token ) // <3>
start . transitions [ epsilonChar ] = append ( // <4>
start . transitions [ epsilonChar ] ,
from ,
)
for i := 2 ; i <= copyCount ; i ++ { // <5>
s , e := tokenToNfa ( & p . token )
// connect the end of the previous one
// to the start of this one
to . transitions [ epsilonChar ] = append ( // <6>
to . transitions [ epsilonChar ] ,
s ,
)
// keep track of the previous NFA's entry and exit states
from = s // <7>
to = e // <7>
// after the minimum required amount of repetitions
// the rest must be optional, thus we add an
// epsilon transition to the start of each NFA
// so that we can skip them if needed
if i > p . min { // <8>
s . transitions [ epsilonChar ] = append (
s . transitions [ epsilonChar ] ,
end ,
)
}
}
to . transitions [ epsilonChar ] = append ( // <9>
to . transitions [ epsilonChar ] ,
end ,
)
if p . max == repeatInfinity { // <10>
end . transitions [ epsilonChar ] = append (
end . transitions [ epsilonChar ] ,
from ,
)
}
- From our notes earlier, we know that if minimum is 0, we need to have an epsilon transition from the start state to the end state
copyCountis the maximum number of times we need to create an NFA fromp.token.- if the max is infinity and min is 0, it is 1 because we need to create at least one copy
- if the max is infinity and min is non-zero, it is the min value because, we need to repeat it at least
p.mintimes. - if the max is not infinity,
copyCountis whatever the max is.
- Just like we did in the group type, we need to concatenate multiple NFAs, so we start by creating the first copy of this NFA.
- The start state is connected to the start of this new NFA.
- We iterate the remaining amount of times
- The actual concatenation step; where we connect the end of the previous NFA to the start of the current NFA.
- Save the start and end of the current NFA.
- Once we have created the minimum required number of NFAs, the rest must be optional. Thus, we add an epsilon transition from the start of each of those new optional NFAs to the end state.
- Connect the end of the last NFA, to the end state.
- If the upper bound is infinity, add an epsilon transition from the end state to the start of the last NFA.
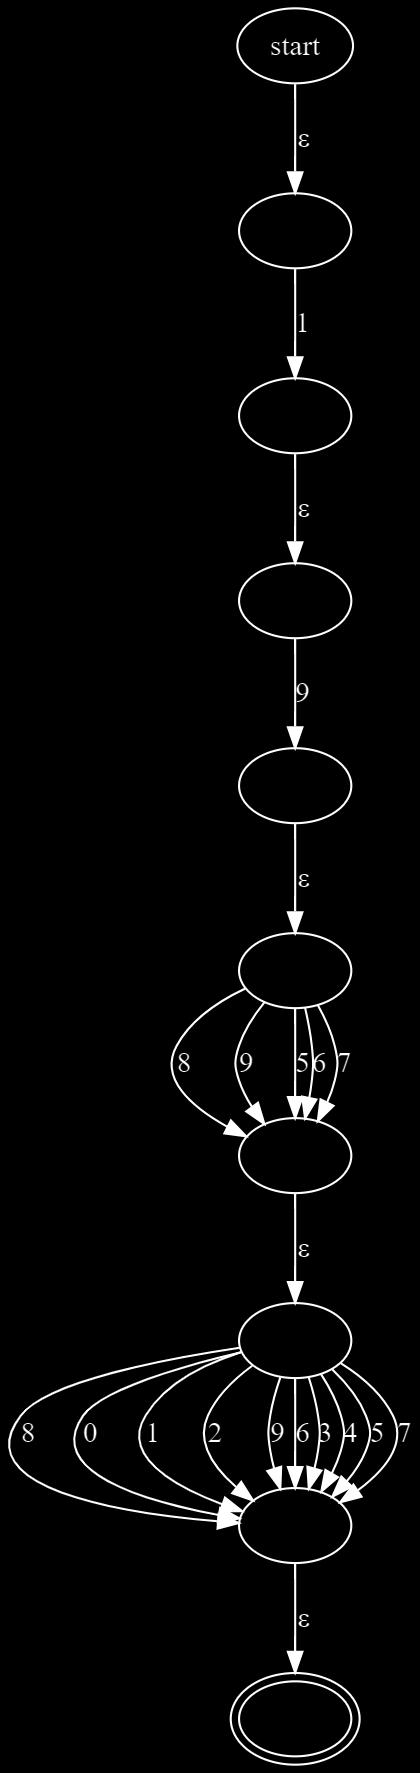
Example
Considering all the techniques we discussed above, this is what we would generate for this regex: 19[5-9][0-9]:
Matching
Final piece of our regex engine is the matching logic. The basic idea is that we'll feed each character of the test string, in order, to our current NFA state until we reach to the end of the string. If we finish the entire string and we're at the terminal state, it means the string matches with the regex.
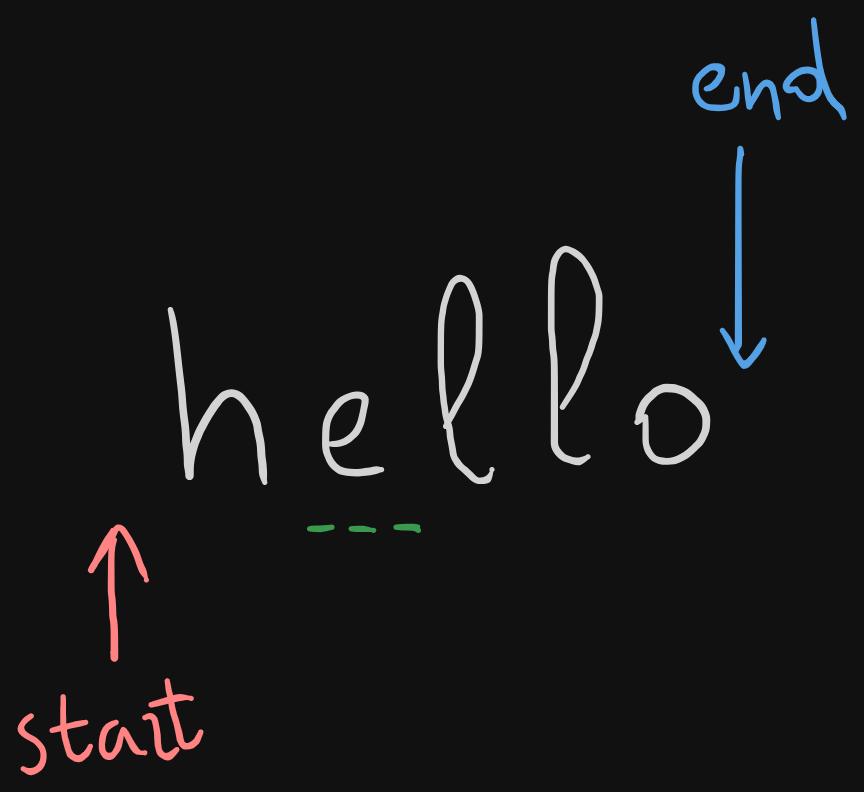
While going through the string, we'll use a cursor/pointer to a certain position in the string. The image below visualizes this. Keep in mind that, in addition to each index in the string, our pointer can also reference to the beginning of the string (prior to matching) and the end of the string (once we exhaust all the characters).
In code, we'll have these helper constants and method.
const (
startOfText uint8 = 1
endOfText uint8 = 2
)
func getChar ( input string , pos int ) uint8 {
if pos >= len ( input ) {
return endOfText
}
if pos < 0 {
return startOfText
}
return input [ pos ]
}
Now onto the code for matching:
func ( s * state ) check ( input string , pos int ) bool { // <1>
ch := getChar ( input , pos ) // <2>
if ch == endOfText && s . terminal { // <3>
return true
}
if states := s . transitions [ ch ] ; len ( states ) > 0 { // <4>
nextState := states [ 0 ]
if nextState . check ( input , pos + 1 ) { // <5>
return true
}
}
for _ , state := range s . transitions [ epsilonChar ] { // <6>
if state . check ( input , pos ) { // <7>
return true
}
if ch == startOfText && state . check ( input , pos + 1 ) { // <8>
return true
}
}
return false // <9>
}
(s *state)is just a way to add a function to thestatestruct in Golang, not relevant to the algorithm- We get the current character we need to check for. It can be a valid character from the string, startOfText or endOfText
- If we're at the end of the string and at the terminal state, that means the string matches the regex, so we return true.
- For the current character, we check if there's any transition specified.
- If such transition exists, we grab the next state, increment the position pointer and check. If check is a success, we return true.
- Example: let's say
inputishello. Once there's a match forh, the next state would try to match the charactere.
- Example: let's say
- If there's no character transition, we check for empty/epsilon transitions.
- For all such transitions, we try to check the next state with the same input and position. Since it's an empty transition, there's no need for incrementing the position. If the check is a success, we return true
- There's a chance that we get stuck at the start of the text and never actually progress. This condition is to prevent such conditions.
- If nothing matches, it's a failure, and we return false.
Testing
Finally, let's test our code against some input. Please keep in mind that, some of those invalid emails are actually valid in real world, but since our regex is a simplified version, it does not accept those ones.
func TestNfa ( t * testing . T ) {
var data = [ ] struct {
email string
validity bool
} {
{ email : "valid_email@example.com" , validity : true } ,
{ email : "john.doe@email.com" , validity : true } ,
{ email : "user_name@email.org" , validity : true } ,
{ email : "support@email.io" , validity : true } ,
{ email : "contact@123.com" , validity : true } ,
{ email : "sales@email.biz" , validity : true } ,
{ email : "test_email@email.test" , validity : true } ,
{ email : "random.email@email.xyz" , validity : true } ,
{ email : "user@domain12345.com" , validity : true } ,
{ email : "user@12345domain.com" , validity : true } ,
// invalid when compared against our regex
{ email : "alice.smith123@email.co.uk" , validity : false } ,
{ email : "invalid.email@" , validity : false } ,
{ email : ".invalid@email.com" , validity : false } ,
{ email : "email@invalid..com" , validity : false } ,
{ email : "user@-invalid.com" , validity : false } ,
{ email : "user@invalid-.com" , validity : false } ,
{ email : "user@in valid.com" , validity : false } ,
{ email : "user@.com" , validity : false } ,
{ email : "user@.co" , validity : false } ,
{ email : "user@domain.c" , validity : false } ,
{ email : "user@domain.1a" , validity : false } ,
{ email : "user@domain.c0m" , validity : false } ,
{ email : "user@domain..com" , validity : false } ,
{ email : "user@.email.com" , validity : false } ,
{ email : "user@emai.l.com" , validity : false } ,
{ email : "user@e_mail.com" , validity : false } ,
{ email : "user@e+mail.com" , validity : false } ,
{ email : "user@e^mail.com" , validity : false } ,
{ email : "user@e*mail.com" , validity : false } ,
{ email : "user@e.mail.com" , validity : false } ,
{ email : "user@e_mail.net" , validity : false } ,
{ email : "user@sub.domain.com" , validity : false } ,
{ email : "user@sub-domain.com" , validity : false } ,
{ email : "user@sub.domain12345.com" , validity : false } ,
{ email : "user@sub.domain-12345.com" , validity : false } ,
{ email : "user@-sub.domain.com" , validity : false } ,
{ email : "user@sub-.domain.com" , validity : false } ,
{ email : "user@domain-.com" , validity : false } ,
{ email : "user@sub.domain.c0m" , validity : false } ,
{ email : "user@sub.domain.c" , validity : false } ,
{ email : "user@sub.domain.1a" , validity : false } ,
{ email : "user@sub.domain.c0m" , validity : false } ,
{ email : "user@sub.domain..com" , validity : false } ,
{ email : "user@sub.domain.c0m" , validity : false } ,
{ email : "user@sub.domain..com" , validity : false } ,
{ email : "user@sub.domain.c0m" , validity : false } ,
}
ctx := parse ( `[a-zA-Z][a-zA-Z0-9_.]+@[a-zA-Z0-9]+.[a-zA-Z]{2,}` )
nfa := toNfa ( ctx )
for _ , instance := range data {
t . Run ( fmt . Sprintf ( "Test: '%s'" , instance . email ) , func ( t * testing . T ) {
result := nfa . check ( instance . email , - 1 )
if result != instance . validity {
t . Logf ( "Expected: %t, got: %t\n" , instance . validity , result )
t . Fail ( )
}
} )
}
}
All the tests pass. We're done.
Of course, there's a lot to improve in the code. You can check out the Github repository for this project. While the code will not be the exact same, the ideas are the same.
Cheers!
References
- Thompson's construction - Wikipedia
- Regular expression - Wikipedia
- Shunting yard algorithm - Wikipedia
- https://deniskyashif.com/2019/02/17/implementing-a-regular-expression-engine/
- https://learn.microsoft.com/en-us/dotnet/standard/base-types/regular-expressions
- regex101.com
- https://github.com/python/cpython/blob/main/Lib/test/re_tests.py
- https://blog.cernera.me/converting-regular-expressions-to-postfix-notation-with-the-shunting-yard-algorithm/
- gobyexample.com